For business requirements or company changes, there can be scenarios which required to migrate to New Domain or new Active directory forest. When Office 365 configured with Directory synchronization, there are few additional steps will required to configure before you move your AAD Sync service to new infrastructure. From this post I’m explaining step by step on how to migrate Directory synchronization service to New Active directory environment according to the Microsoft Best practices.
Technical Background
When you first introduce Directory sync, its will create new objects in Office 365 using on premise object information. By default it will used account UPN as the accounts unique identifier (Email address) or you can use a secondary identification such as Email address of the account. After creating the account in Azure active directory (O365), any changes to this on premise object will be replicate to the cloud object. But how this on premise object and cloud object is linked each other?
In Active directory you may heard about Object GUID, this is the unique identifier for any object in Active directory. But in Azure AD this is different. It Use an ID called Immutable ID. Immutable ID is generated by Object GUID and it’s the unique identification of the cloud object. So both Object GUID and Immutable ID is relative to each other. Using this ID’s, Directory sync service will find the correct object to sync the relevant changes from on premise Active directory.
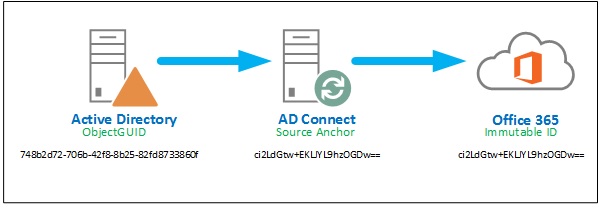
So what happening after you migrate you’re on premise active directory to a new one. Most common tool is ADMT when comes to domain migration, but ADMT tool actually copies accounts instead of moving them. You will get new Object GUID on new accounts. So if you configured directory sync it will fail saying duplicate items. The solution is to match the new Object GUID with Immutable ID. There is two ways to do this.
- Soft Match
- Hard Match
Soft Match
This method you have to clear the current Immutable ID from Azure Active directory. From next Directory sync Immutable ID will be generated from Object GUID and saved in Azure Active Directory. Using following commands you can clear the Immutable ID.
Get Immutable ID -
Get-MsolUser –UserPrincipalName [email protected] | select ImmutableID
Clear Immutable ID –
Set-MsolUser -UserPrincipalName "[email protected]" -ImmutableId "$null"
Hard Match
From this method you have to generate the Immutable IT which is relevant to current Object GUID and place it in Azure active directory. Then Azure AD sync will relate each other.
Get Immutable ID from on premise AD
$user = Get-ADuser –Identity (Username)
$Guid = $user.ObjectGUID
$immutableid=[System.Convert]::ToBase64String($guid.tobytearray())
Set Immutable ID
Set-MsolUser -UserPrincipalName "[email protected]" -ImmutableId "xxxxxxxxxxx"
Migration Approach
As described earlier Immutable ID need to be migrated when you are migrating Directory sync from one domain to another. You can either select Soft match or hard match depending on your environment. In following steps I’m describing how to do a hard match.
- Disable Directory Sync
Directory sync should be disabled from Office 365 tenant. This should do using Azure PowerShell. Connect to the MsolServices and use the following commands.
Set-MsolDirSyncEnabled –EnableDirSync $false
You can check the progress by running following command.
(Get-MSOLCompanyInformation).DirectorySynchronizationEnabled

- Stop and Disable Microsoft Azure AD Sync service from Local server.
- Migrate Users to new domain
You can use ADMT or script to migrate users to the new domain. If you are using a script make sure to move all attributes of the users, attributes such as Proxy address are important.
- Login to the new domain and generate Immutable ID’s using ObjectGUID.
Following script will generate Immutable IDs with UPN of the user. Run this PowerShell script in new domain controller.
$usersTable = New-Object system.Data.DataTable “UsersTable”
$column1 = New-Object System.Data.DataColumn userPrincipalName,([String])
$column2 = New-Object System.Data.DataColumn immutableId,([String])
$usersTable.Columns.Add($column1)
$usersTable.Columns.Add($column2)
$users=Import-Csv -Path users.csv -Header “userSamAccountName”
foreach($user in $users)
{
$adUser = Get-ADUser -Identity $user.userSamAccountName
$adUserGuid = $adUser.ObjectGUID
$byteArray = $adUserGuid.ToByteArray()
$immutableId = “”
$immutableId = [system.convert]::ToBase64String($byteArray)
$row = $usersTable.NewRow()
$row.userPrincipalName = $adUser.userPrincipalName
$row.immutableId = $immutableId
$usersTable.Rows.Add($row)
}
$usersTable | Export-Csv “usersall.csv”
- Before modifying all the users add immutable id’s to few users, use the following command.
Set-MsolUser -UserPrincipalName "[email protected]" -ImmutableId "xxxxxxxxxxx"
- Update all users Immutable ID’s
Login to the Msol services using Azure powershell and run the following script
$users = Import-Csv -Path “usersall.csv”
foreach($user in $users)
{
Write-Output $user.userPrincipalName
Set-MsolUser -UserPrincipalName $user.userPrincipalName -ImmutableId $user.immutableId
}
You can see line by line each user getting updated,
- Enable Directory sync
Run the following command in Azure PowerShell
Set-MsolDirSyncEnabled –EnableDirSync $ture
- Configure the AD connect on the new server and run an initial Sync,
Use this blog post on configuring AAD Connect
You can check the progress by event viewer, or opening the synchronization manager console. All users should be matched without errors.
Hope this post is useful
Thanks
Asitha De Silva
