TSPrint has almost become a standard when it comes to remote desktop printing. TSPrint is so simple to use and user-friendly that most of your users do not even notice they're using it. Another great feature of this excellent remote desktop printing software is the ease of use. As you already probably know, TSPrint is a plug-and-play solution, but did you know it has many "hidden" features that can make it even more versatile?
No? Well, let's see what else TSPrint can do!
1. TSPrint Default Printer Application
Not many of our users are aware of this small but useful application, which comes with the TSPrint Server installation.
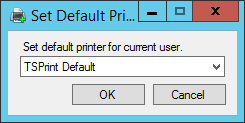
The advantage of using this application is skipping a few steps when it comes to setting a default printer for a specific user. Usually, you would have to open up the Control Panel, go to Devices and Printers, and then manually select the default printer. But you can forget about that process with this application.
Where can I find it, you ask?
Just open up the Start Menu on your terminal server session and start typing "Default Printer" and voila! There it is! You just saved yourself a few clicks!
You can also find it in the TerminalWorks folder in the Start Menu.
2. Set a dynamically redirected printer as a default printer
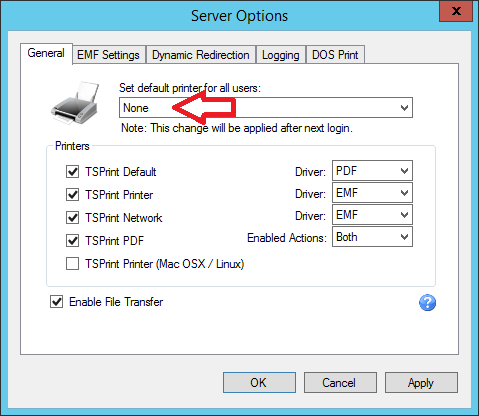
If you prefer dynamic redirection over our virtual printers, you can avoid TSPrint Default as a default printer and use your dynamically redirected printer in your remote desktop session.
To do that, open up the TSPrint Server Options and on the "General" tab, set the value of the "Set default printer for all users" to: "None"
Now, when we have that set to "None," let's go to the "Dynamic Redirection" tab and put a checkmark on the "Use Local Default Printer As Default."
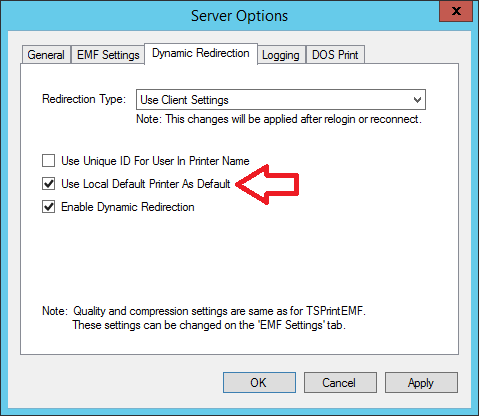
That should do it. Next time when your users log into the remote session, their default printer will be dynamically redirected one, and it will match the printer which is set as a default on their local machine.
3. Customize the names of TSPrint Default, TSPrint Printer, and TSPrint PDF
Everyone loves a little customization if there is an option for it. That's why we have a small workaround on how to change the names of our virtual printers on the server-side.
Let's see how to do it.
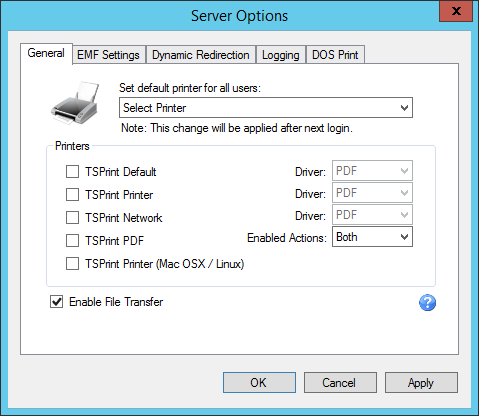
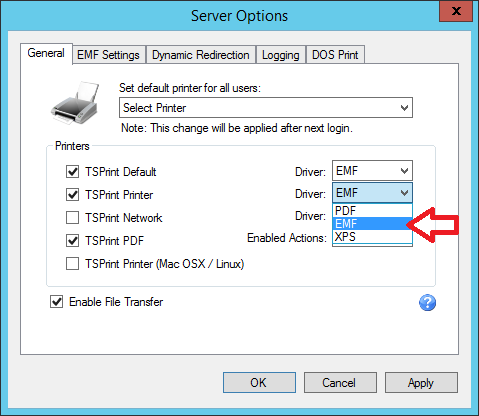
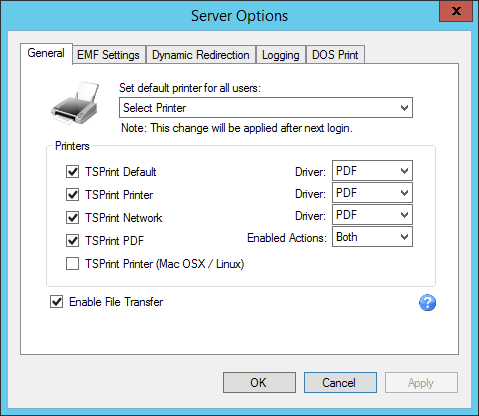
First, we need to disable the default ones generated by the server part installation. So once again, launch the TSPrint Server Options and remove the checkmarks from the TSPrint Default, TSPrint Printer, and the TSPrint PDF, so it matches the settings shown on the image below. Apply the changes.
Now, let's go to another powerful tool which comes with the TSPrint installation called TSPrint Printer Manager. You can access it from the Start Menu on your terminal server by typing in "Printer Manager" or by navigating to the TerminalWorks folder.
The following window will open up. Now, we need to click on the green "plus" sign.
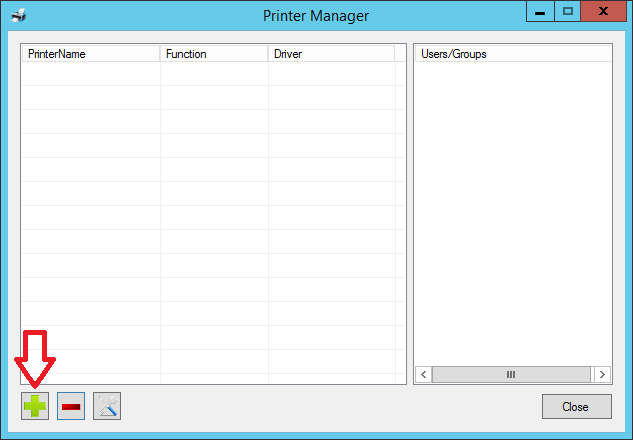
You will see the following options:
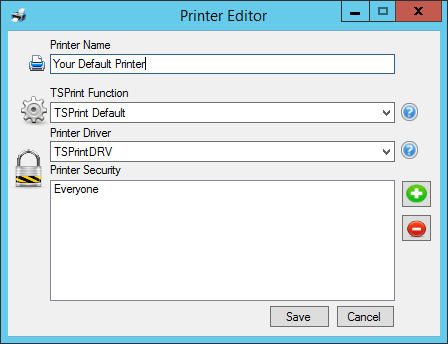
Printer Name – this one is quite self-explanatory, let's say we'll replace the TSPrint Default with the printer we're creating now, so I'll call it „Your Default Printer. “
TSPrint Function – since we're replacing the TSPrint Default with this custom printer, let's set this function to the TSPrint Default.
Printer Driver – now this one depends on your environment, but the default is PDF (DRV), so let's leave it as „TSPrintDRV.“
Printer Security – leave it on Everyone if that's fine with you
So, after all the changes, the settings for the TSPrint Default should look like this:
Now, to change the options for the TSPrint Printer, create a new printer, and follow the same steps as above. Just make sure to use the printer name you wish and use the "TSPrint Function" for the TSPrint Printer as "TSPrint Printer" and for the TSPrint PDF set it to "TSPrint PDF."
This is how my final configuration of the custom TSPrint printers looks like:
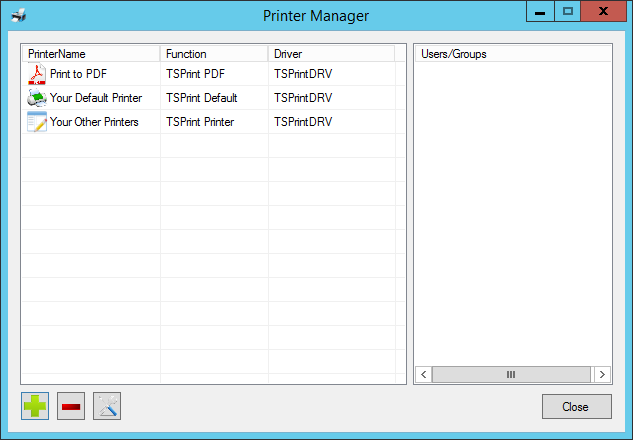
Congratulations! You have successfully customized your TSPrint configuration!
4. Give EMF a try!
I won't bother you with all the details regarding the EMF, but shortly – EMF or Enhanced MetaFile is a term for spool file format used in printing.
When using the EMF, a print job is sent page-by-page to the local PC. This can, in specific environments, speed up the printing process or even resolve some printing issues like: distorted fonts, compatibility issues with individual printers, etc.
If you wish to try out EMF as a driver, open up the TSPrint Server Options and change the TSPrint Printer and TSPrint Default from PDF to EMF.
Now try printing to it and see if there is any difference when it comes to printing in your environment.
5. Add some more compression to your print jobs
By default, all print jobs sent by the TSPrint are compressed, but now while we're still at EMF configuration, there is an option to add additional compression to it.
Let's head to our already well known "command center" called TSPrint Server Options and go to the "EMF Settings" tab.
You will see the following:

Don't let the title "Enable JPEG Compression" confuse you as that refers to each print job generated while the virtual printer is set to the EMF driver.
Feel free to play around with the settings here, both ZIP and JPEG compression, and see what works best for you.
6. Change the way TSPrint PDF behaves
This is one of my favorites – truly a hidden gem of the TSPrint capabilities.
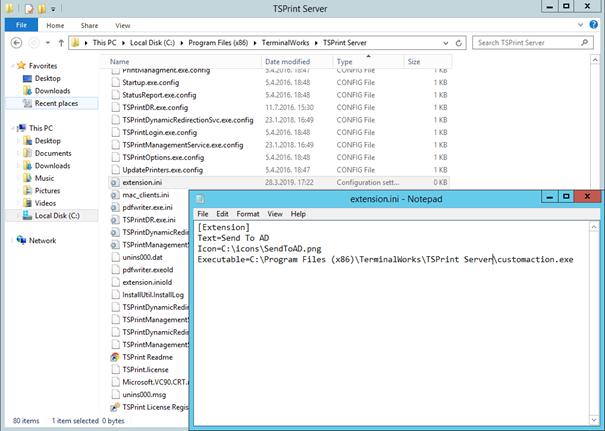
What you have to do here is to navigate to the installation folder of the TSPrint Server: "<ProgramFiles>\TerminalWorks\TSPrint Server" and create a file called "extension.ini"
The extension.ini file can be customized with the following keys:
Text ---> text which will be visible on your new extension button
Icon ---> path to the image that will be visible on your new extension button. Please note that the icon should be 24x24; however, the icon is optional.
Executable ---> full path to the executable; the first argument to this executable will be a full path to the PDF file.
Below is an example of the extension.ini file located on my server.
NOTE: You will not be able to set this setting differently for each user. However, you can use environment variables like the OutputDir=%appdata% for example.
Enjoy your new TSPrint PDF option!
P.S. The "OutputDir" option is also called "silent printing option", to force TSPrint PDF to print silently simply insert the following in the extension.ini file:
Example:
[Extension]
OutputDir=%appdata%
Another example:
[Extension]
OutputDir=C:\Users\John\Desktop
7. Export and import printers from TSPrint Printer Manager
By using the commands below, you can export all the printers from the printer manager. This will export all the printers with designated rights, names, and functions.
If the specific user is defined for a particular printer and that specific user isn't found during the import procedure, the printer will be created without the missing user.
However, if you have a printer created with the Windows Driver function, and if the required driver is missing on the server where you're importing the printer, the printer won't be created.
Usage:
PrintManagment.exe /export:"<full file path>" [/log:"<full file path>"]
PrintManagment.exe /import:"<full file path>" [/log:"<full file path>"]
Example:
PrintManagment.exe /export:"C:\Users\Administrator\Desktop\printers.xml"
PrintManagment.exe /import:"C:\Users\Administrator\Desktop\printers.xml"
PrintManagment.exe /export:"C:\Users\Administrator\Desktop\printers.xml" /log:"log.txt"
PrintManagment.exe /import:"C:\Users\Administrator\Desktop\printers.xml" /log:"log.txt"
8. Add printers to the Printer Manager through the command line
To add printers to the Printer Manager through the command line, you need to execute the PrintManagment.exe, which is located in the installation folder of the TSPrint Server.
Exact path: C:\Program Files (x86)\TerminalWorks\TSPrint Server\PrinterManagment.exe
List of available parameters:
/p:“<printer_name>“
/f:“<printer_function>“
/d:“<printer_driver>“
/remove
Here is an example of adding a printer called „Test“ with „User Defined“ function and EMF driver.
Example: PrintManagment.exe /p:“Test“ /f:“User defined“ /d:“TSPrintEMF“
Now, an example of deleting the printer:
Example: PrintManagment.exe /p:“Test“ /remove
9. Duplex printing
We get quite a lot of questions on duplex printing, so let's cover that one too.
You can configure duplex printing in two different ways. But there is a difference. If you wish to print only certain documents as duplex use the first method described below. If you want to set duplex as the default printing option, so every document is always printed as the duplex, follow the second method.
1. Method – per document:
If you choose the TSPrint Printer, the pop-up window will be shown before printing takes place. Then click on "Properties" and the local window of the printer you've chosen before the pop-up. If your printer supports duplex printing, you will be able to see that option on that window.
2. Method – default duplex settings for every document
In this case, you will have to set printing defaults for the desired printer. To accomplish this, go to Control Panel, then Devices and Printers.
Here select the printer you wish to print to (NOTE: TSPrint Printers are stacked behind one another) and right-click on it.
Go to "Printer properties" and click on it. Afterward, click on the "Advanced" tab and then click "Printing Defaults."
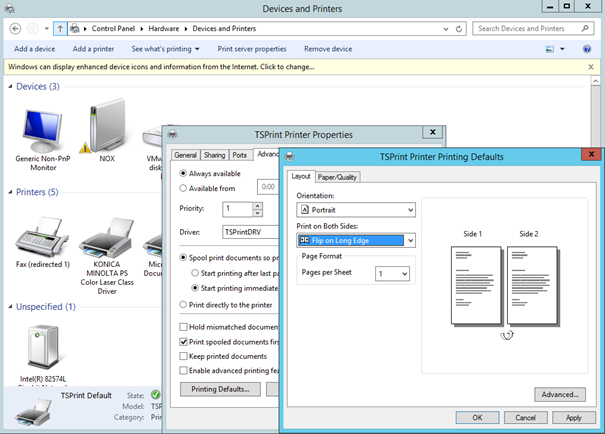
You will notice an option called "Print on Both Sides," that is the duplex option. I have selected "Flip on Long Edge" but feel free to choose the option that suits best for you, and that's it!
You're now all set for duplex printing as your default printing method for every document. Just make sure every user logs off and back on for that option to be applied to everyone.
10. How to make printing settings permanent
While we're still at the printing defaults, let's cover this often asked question as well. The procedure is the same as in the section above. In my example, I want to change the settings of the TSPrint Default to always print black and white.
To do this, I'll do the following steps:
1. Open up the Control Panel
2. Click on Devices and Printers
3. Right-click on the TSPrint Default
4. Hover over the Printer properties
5. Click on the TSPrint Default again
6. Now select the Advanced tab
7. Click on "Printing Defaults"
8. And now play around! Whatever you change here, as an administrator, will be applied to all of your users as soon as they relog from their remote session.
9. Click "Apply" and your job here is done.
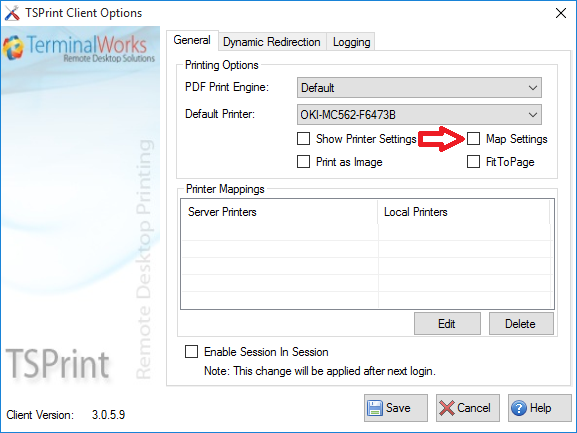
11. How to use local printer settings rather than the server settings
This one is very simple. For TSPrint to only apply the local printer settings and disregard the server settings, all you have to do is open the TSPrint Client Options and remove the checkmark from the Map Settings checkbox, as shown in the image below.
Save it, log off from the RDS, log back on the RDS and done!
12. How to print to the printer used by a different user
Imagine if you could print a document to the printer located in the next room? Or a printer located in some other office? Or even another building?
We have some good news for you! That is possible with the TSPrint Network printer. BUT the main requirement is that those users have to be connected to the same terminal server as you are.
This printer isn't enabled by default, so we have to enable it first. Let's go to the TSPrint Server Options and put a checkmark in the TSPrint Network checkbox.
And that's it. Now if you print to it, you will see all the users connected to the terminal server and their printers. Just bear in mind, for the user to receive a print job, that user needs to have TSPrint Client part installed.
13. How to set a static name for the dynamically redirected printer
As you already know, in TerminalWorks, your voice is heard. And this, as the most requested feature, was implemented in the TSPrint.
From now on, dynamically redirected printers won't change their name when the user connects back to the remote session. Just make sure to enable that feature!
To do it, all you have to do is to go to the Dynamic Redirection tab in the TSPrint Server Options, and check the "Use Unique ID For User In Printer Name" checkbox.
And that's it!
Now, your printers will have a long string of numbers at the end, but those numbers won't change.
Here is an example:
Before: Epson #003 --> Relog --> Epson #412 --> Relog --> Epson #122
After: Epson #0003 --> Relog --> Epson #0003 --> Relog --> Epson #0003
Conclusion
Hope you enjoyed these 13 great tips, which (we hope) have made your TSPrint experience smoother and even more simplified.
Should you have any additional questions, our awesome support team is here for you!