One of the top advantages of moving to the cloud is the pay-as-you-go model. Where you pay only for what you use. For example, Azure VM’s are not getting charged if they are in the deallocated state. When optimizing the costs of WVD, we are considering this fact. If an organization work 8 am – 8 pm, we can turn on the VM’s only for that period. But what If a user forgot some work and needed to access their VM overnight. Without Start virtual machine on connecting feature, the user needs to wake up the Admin to start the VM, or WVD should be configured with PowerApps to self-start the VM app.
From this post, let us see how we can configure this. Start the virtual machine on connecting feature and the user experience of a WVD user. However still, this feature is on Public preview, and you can only configure it through PowerShell. With GA, it will join the Azure Portal.
Consider first
- This feature only supported Personal / Dedicated host pool types.
- Remote desktop client version 1.2748 or later
- Configuration still only through PowerShell
- It's still in public preview, which means there is no SLA and not suited for production environments, but it's just turning on a VM, so go ahead and try.
- I have not covered auto-shutdown configuration for Host pool VM’s
Create a Custom role to assign permissions
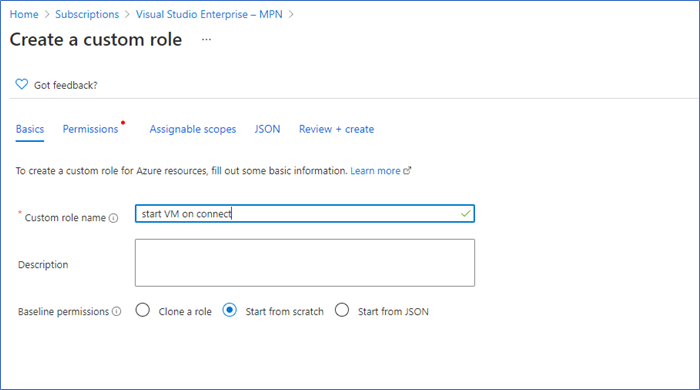
First, you need to create a custom role in RBAC to provide access rights to manage VM’s by the WVD service. This permission will be used to turn on the VM’s when connecting through WVD. Also, you can grant this permission to the entire subscription or to a particular resource group where your WVD VM’s reside. Here I am creating this role from Azure Portal.
- Login to Azure Portal – Subscription
- Click Subscription – Access Control (IAM) – Add – Add custom role

- Name the custom role “start VM on connecting,” Next.
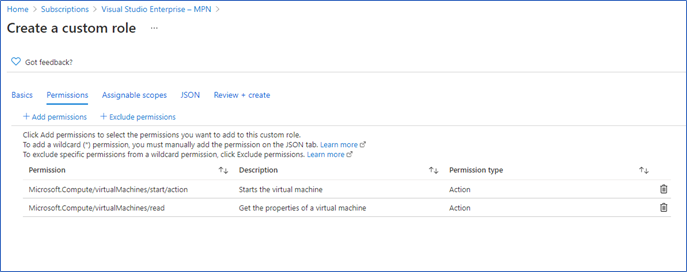
- In Add permissions, add the following permissions.
Compute/virtualMachines/start/action
Compute/virtualMachines/read


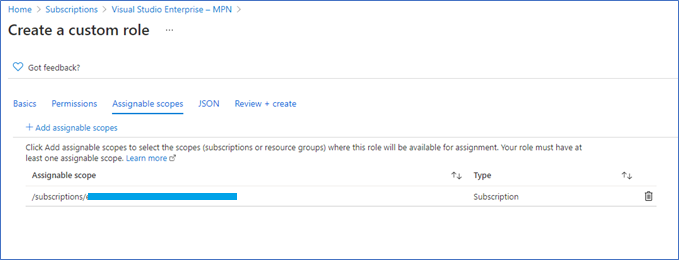
- Here we have selected the scope as the subscription, which means this permission will apply to all the VM’s in the subscription.
- Click Next and create the custom role.
- Next, you need to assign this custom role to grant access to Windows Virtual Desktop, In IAM, click role assignments.
- Select the custom role (start VM on connect) and in select type Windows virtual desktop and select as below
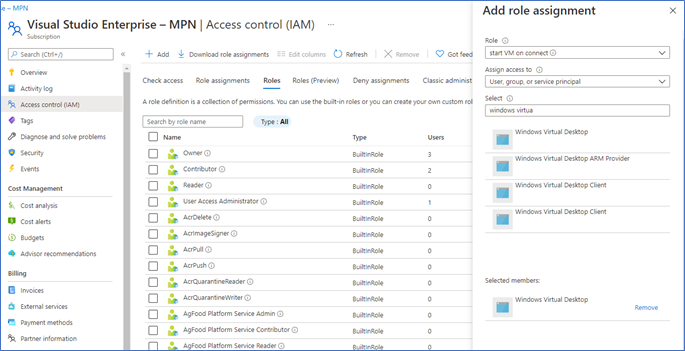
- Click Save to assign the role.
Enable Start VM on Connect on Host pool.
In each Host pool, you need to enable this feature. As of today, this can only do through PowerShell. However, very soon, this feature will be available in the Azure portal.
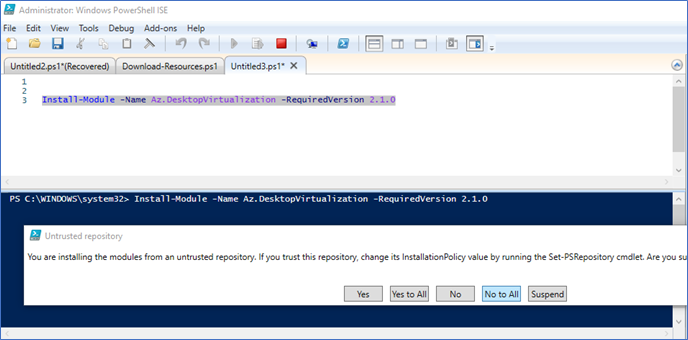
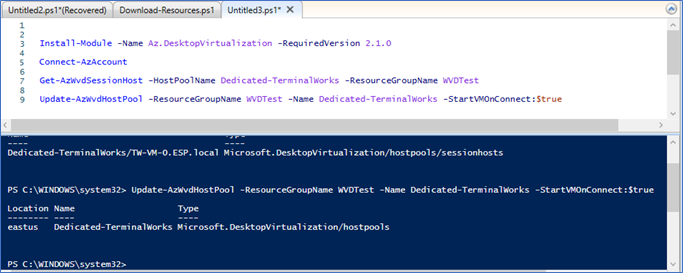
- If you are not already connected to WVD services using PowerShell, follow the below steps. First, make sure you have the latest Az.DesktopVirtualization module installed.
PowerShell Gallery | Az.DesktopVirtualization 2.1.0
- Copy the below command on PowerShell to install
Install-Module -Name Az.DesktopVirtualization -RequiredVersion 2.1.0
- Connect to the Azure Account - Connect-AzAccount
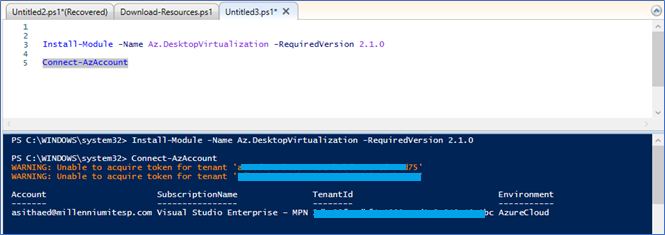
- Select the relevant subscription by - Select-AzSubscription -Subscription
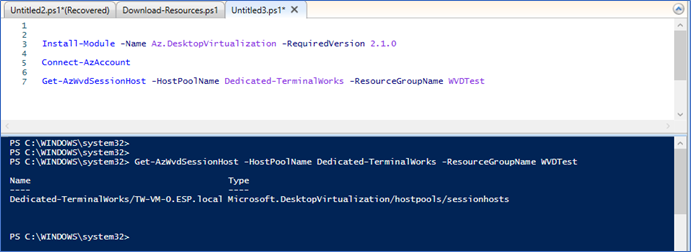
- To make sure everything is connected, type the below command to retrieve your host pool
- Now you can enable Start VM on Connect: by running the below command.
Update-AzWvdHostPool -ResourceGroupName <resourcegroupname> -Name <hostpoolname> -StartVMOnConnect:$true
- Continue the same with all the Host pools.
Note – as I mentioned before, enabling this feature is only available with PowerShell for right now. But it will be integrated into the Azure portal and Host pool properties.
Host pool – Properties – Start VM on connect - Yes
End-User Experience
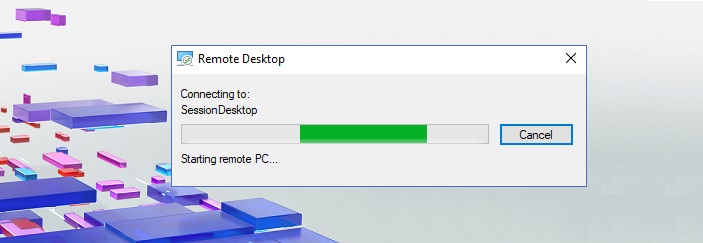
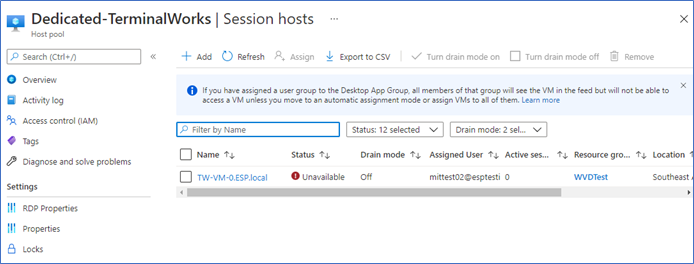
You can test the configuration by deallocating a WVD VM and trying to connect to it. Check the VM is deallocated and Unavailable in the WVD portal.
Then try to connect to the VM by Remote desktop client, you can see the status as Starting remote PC. This may take 5 to 10 minutes, and you can see your VM is loaded.

Starting VM on connecting feature has a 15-minute time out. This means if the VM failed to boot within 15 minutes, this process would get ended and you can try again or start troubleshooting from diagnostic features - Windows Virtual Desktop diagnostics log analytics - Azure | Microsoft Docs.
Also, please note I only talked about starting the VM and not about deallocating it after use. There is an automated script for deallocating unused VM’s, and we will talk about it in another post.
I hope this post is useful.
Cheers
Asitha De Silva
