Open a ticket
Chat with us

Remote Support

We offer remote support in cases where the issue cannot be resolved via chat or phone call. Software Assurance customers are entitled to premium VIP support from our experienced team.

Download TeamViewer

Download TeamViewer

Frequently asked questions for TSPrint

TSPrint uses the Microsoft Virtual Channels technology, so all traffic goes through the secured RDP connection. No need to forward or open any ports for TSPrint to work. It really is a plug-and-play solution. 

Yes. You can use TSPrint both on an internet connection and your local area network. Now clients that work outside the office will be able to print out documents to their home printer without you having to first install that printer on your Terminal Services server.

No. TSPrint is a plug and play solution. After the simple installation procedure (next,next,next)TSPrint will be ready to go. Compared to the standard way of supporting local printers our way needs just a fraction of the time required to enable clients to use their local printers.
Yes, you can use TSPrint on Windows client operating systems, acting as remote desktop servers.
Please let the client login to the terminal server and then go to:
Start -> Programs -> TerminalWorks -> TSPrint Server -> Client Options/Options

A dialog should show up where you should change the Print Engine from Default to TSPrint Engine.
This should resolve this issue.

Important! Since version 1.9.0.0 of TSPrint you also have to select the Fit To Page option on the client dialog.

Please visit this link: Communication Error

Yes, TSPrint has full support for your Citrix based environment. Just install it as you would on a normal terminal server (RDP) environment and you will be able to use TSPrint.
No, there is no need for that as all versions of TSPrint are compatible with each other. The only drawback is that you will be missing the features from the current TSPrint client releases.

Please follow the video instructions on how to install TSPrint.


Take a look at this short video tutorial on how to install the TSPrint Client for MacOS.


(Minimum Version: 1.8.6.0) TSPrint is mostly used with two types of TSPrint printers: TSPrint Default and TSPrint Printer. The TSPrint Default printer will print everything to the local default printer without any dialogs. The TSPrint Printer in return will show each time a dialog where you can select the desired printer and its settings.

Now sometimes you would like to create a new printer and tell TSPrint to automatically transfer the print job to another local printer besides the default printer.
This can be done with the new type of TSPrint printer named TSPrint User Defined. By default, the TSPrint installation does not create such a printer.

To map a local printer to a TSPrint printer log-in to your terminal server and go to:
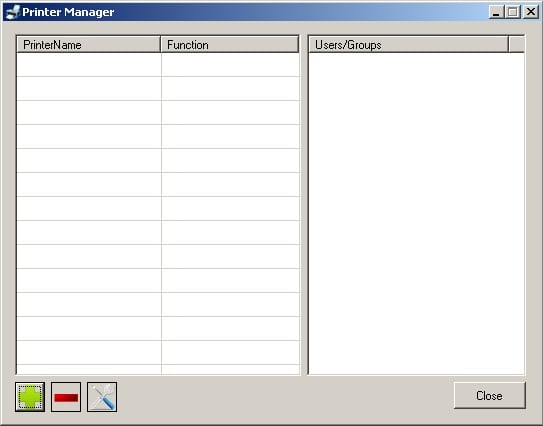
Start -> Programs -> TerminalWorks -> TSPrint Server -> Print Manager
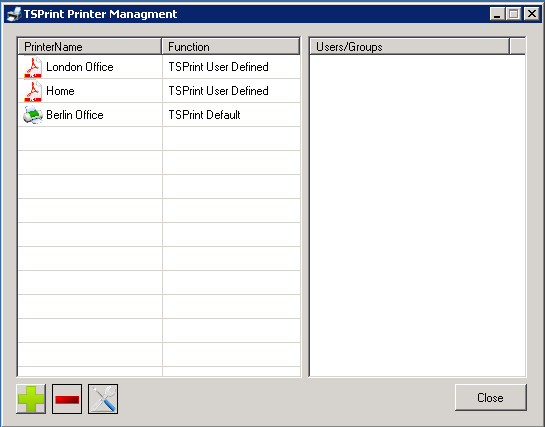
Printer management TSPrint
This is the Printer Manager of TSPrint which enables you to create new TSPrint printers and assign them to different users or groups.


Now to create a new user-defined printer that we can map to a local printer we press the green plus button on the lower-left corner of the dialog. This will show us the following dialog:
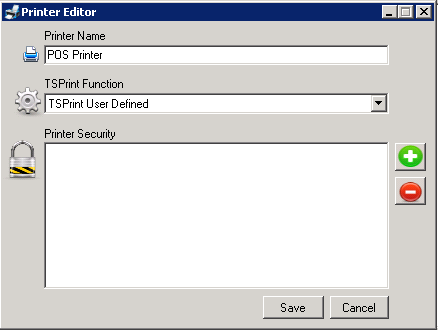
Add new printer TSPrint
The new printer dialog enables to define the name and functionality of the TSPrint printer.


Enter the desired name of the printer and under TSPrint Function, select TSPrint User Defined. Now under the Printer Security field, you can add different users or groups which should be able to see and print to this printer. If you leave this field empty, then only YOU and the server Administrator will see this printer and be able to print to it.

After we save the new printer, it should appear as any other printer in our list:
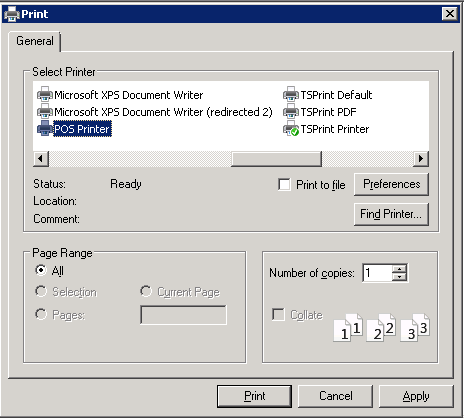
Print dialog TSPrint


Now the first time you print to this printer, a dialog will show up, which will ask you to select the desired local printer. If another user on the terminal server prints to the same printer, he will also receive this dialog the first time, and he will able to select his local printer. By printing on the terminal server to the user-defined TSPrint printer, TSPrint will check if the user has selected a local printer to which print jobs should be transferred. In case he has not, the earlier mentioned dialog will show up.
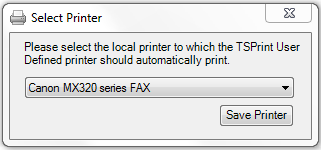
Select Printer TSPrint
Here you select the desired local printer to which the server printer should be mapped to.


Now print to the printer, and your print job will automatically be transferred to the earlier selected local printer. Using this scheme, you can, for example, create a new printer and assign to him form sizes of your local POS printer, and each time, when printing on the terminal server, the print job with the correct form size will be printed on your local POS printer.

There are two ways you can disable this option. The first one would be to disable it globally on the terminal server by setting the right group policy. For more details about the please visit:

Printer Redirection

The second step would be to disable this locally on the workstation from which you connect. To do this please execute MSTSC.exe by going:
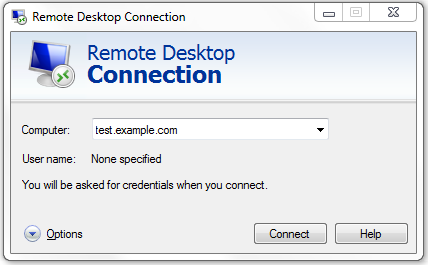
Start -> Run -> mstsc.exe

When the mstsc.exe dialog shows up click on the Options button on the bottom left side:

MSTSC TSPrint


Now click on the Local Resources tab and uncheck the Printers box from the Local Devices and resources group.

Local Resources TSPrint


This only happens in case you have installed Adobe Reader 10 but have not rebooted your server as requested by the Adobe installer.

Adobe Reader will then crash once you go to File -> Print. Once you reboot your server as required Adobe Reader X will work just fine with TSPrint.

This issue is only present in Adobe Reader 10.

If this does not resolve your issue then another bug could be causing this. To resolve it disable Enable Protected Mode at startup.

You can disable this by opening Adobe Reader and going to Edit -> Preferences. Now a new dialog shows up where on the left side you should make sure that General is selected. Once selected on the bottom of the dialog you should find the Enable Protected Mode at startup.

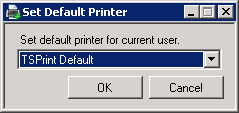
TSPrint offers two different dialogs to configure the default printer. The first one works on a per-user basis and each individual user can set his own default printer by logging in to the terminal server and going to:

Start -> Programs -> TerminalWorks -> TSPrint Server -> Default Printer

Set Default Printer TSPrint


If you wish to disable the defaulting of printers by TSPrint and leave it to Windows then select None as the default printer.

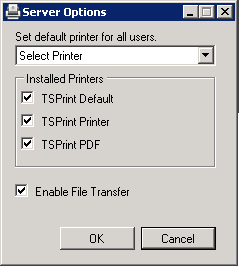
The second dialog works on a per-server basis and allows the system administrator to configure the default printer for all users on the terminal server. You can reach that dialog by going to:

Start -> Programs -> TerminalWorks -> TSPrint server -> Server Options

Server Options TSPrint


The server options dialog will allow you to select the default printer for all users on the terminal server. As with the per-user default printer dialog here you can also select None to tell TSPrint to leave the defaulting of printers to Windows.

Yes, you can use some of the TSPrint binaries to execute actions usually done through TSPrint. For example, you can just execute the following command line command:
C:\PROGRAM_FILES\TerminalWorks\TSPrint Server\pdfwriter.exe open "YOUR_FILE"

This would then invoke the same procedure which is done when you right-click on a file and select TSPrint Open Locally.

Besides the open option you can also use:
-send - To send the file to the local workstation. (A file save dialog will appear)
-mail - To send the file as a new e-mail with the file attached to the e-mail.

Sometimes, very special printers, including special page sizes, are hard to map with our virtual TSPrint printers. Results can be a blank page, bad positioning, etc. The solution is to create a Windows driver printer on the server-side, map local settings perfectly with our Windows driver printer.

To create a Windows driver printer, please follow the steps described in this document.

Log in to your terminal server and open:
Start -> Programs -> TerminalWorks -> TSPrint Server -> Print Manager

Matrix01 TSPrint


Press the green "+" sign to add a new printer.

Matrix02 TSPrint


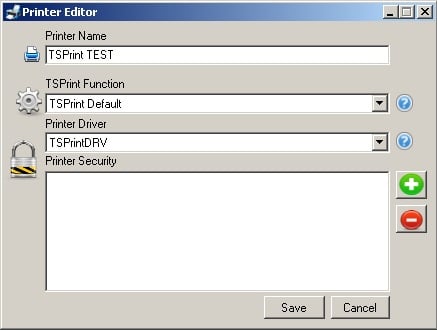
Name the printer as you wish, we named it TSPrint TEST in our example.

Matrix03 TSPrint


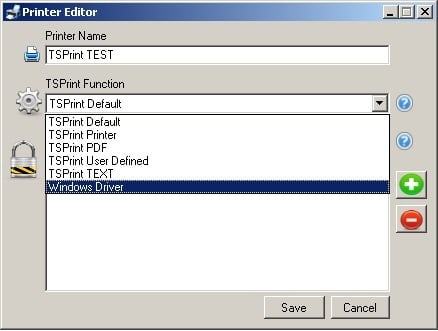
Select Windows Driver as a TSPrint Function.

Matrix04 TSPrint


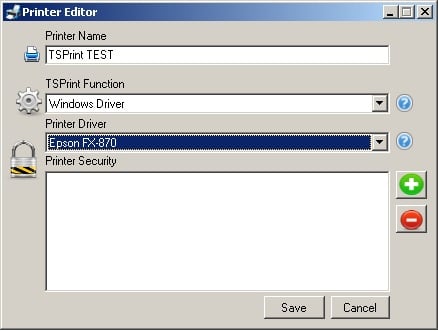
Select the printer driver you installed to your Terminal Server. Ensure that you have the correct drivers that correspond to the actual printer installed at the client workstation. We used Epson FX-870 in our example.
Set up the security options as needed by adding new Users or Groups. You can do so by pressing the green button showing a "+" or the red button showing a "-" sign.

Matrix05 TSPrint


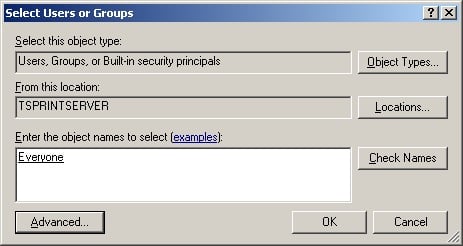
Set up the security options as needed by adding new Users or Groups. We added the Everyone Group in this example. Press OK to confirm.

Matrix05 TSPrint


Press Save to complete the process.

Now print to the newly created printers, and the printed pages should now print out properly.


Changing the Print Engine

Connect to the terminal server through a remote session and open:

Open: Start -> All Programs -> TerminalWorks -> TSPrint Server -> Client Options

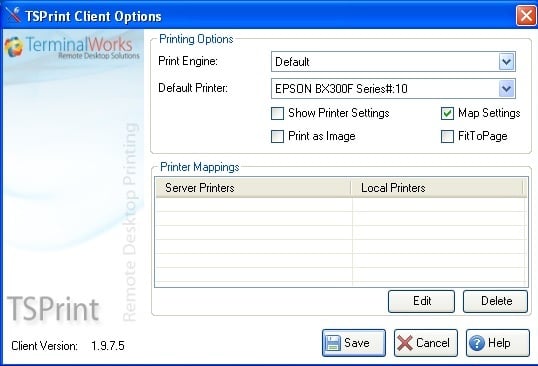
The following window will be shown on your screen:

Client Options01 TSPrint


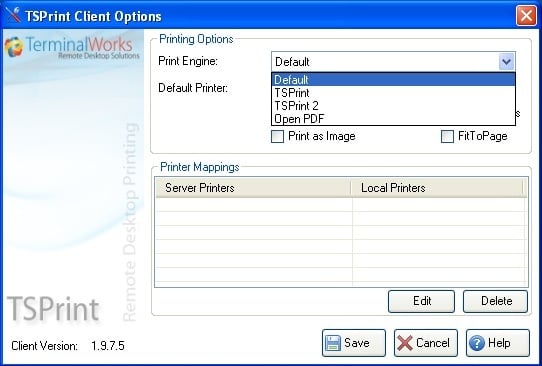
Change the Print Engine using the dropdown menu as shown below. Select the print engine you wish to use and press the 'Save' button.

Client Options02 TSPrint


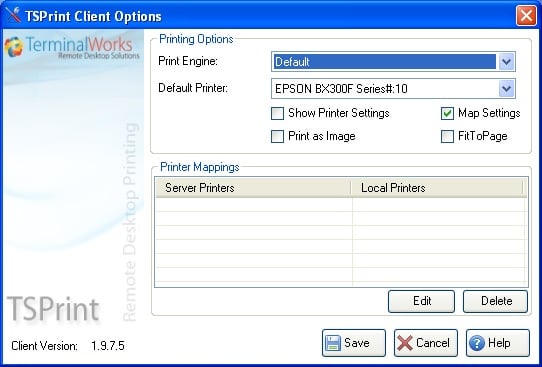
TSPrint Client Options

TSPrint Client Options


Here you can change several options:

- Print Engine
Print engine defines the way data is sent to the printer. Changing this option can help you correct the errors with faulty margins, fonts, and similar. If everything prints out OK, there is no need to change this option from the 'Default' value.

- Default Printer
Use the dropdown menu to select a printer you wish to use as the default one.

- Show Printer Settings
Selecting this option causes the printer's User Interface to be shown before printing.

- Map Settings
Selecting this option will allow you to set printer preferences when printing from the remote session and causing them to map to the local printer. If you do not select this option, and you set up some options (orientation for example) they will be discarded when printing takes place. In this case, local printer preferences will be used.

- Print as Image
Selecting this option will result in the print job being printed out as a picture, instead of a group of characters. This may solve problems when fonts are not printed out correctly but will cause larger print jobs and longer printing times.

- FitToPage
Selecting this option will result in the print result being enlarged or shrunk to the page size. You can use this option in case you experience problems with margins.

- Printer Mappings
Custom printers created by the Print Manager module of TSPrint Server will be shown here. Printers can be edited by pressing the 'Edit' button. You can delete the unwanted printer by pressing the 'Delete' button.

Save selected options and close the window by pressing the 'Save' button.

Pressing the 'Help' button will open TerminalWorks Support pages.

Ericom Blaze RDP

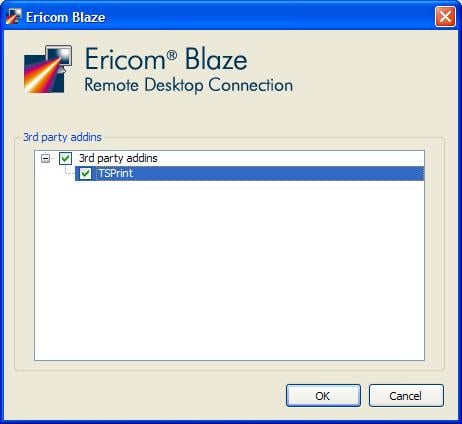
In order for Ericom Blaze RDP to be working with TSPrint or TSScan, you have to do the following:

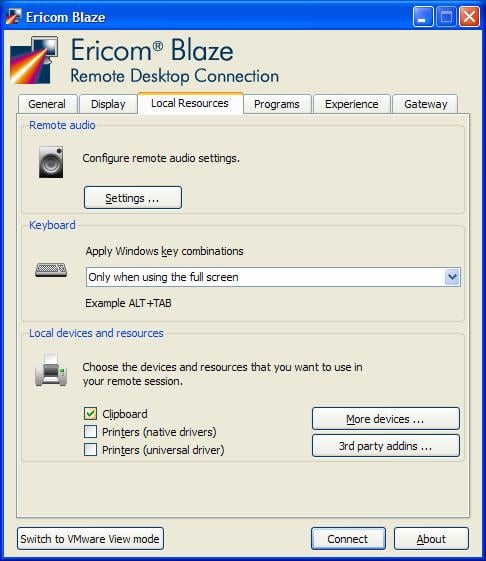
Start Ericom Blaze RDP client and open the 'Local Resources' tab. Press the '3rd party addins' button.

TSPrint Client Options


Check the box next to TSPrint and/or TSScan and press the 'OK' button.

Ericom Blaze


Random printing order

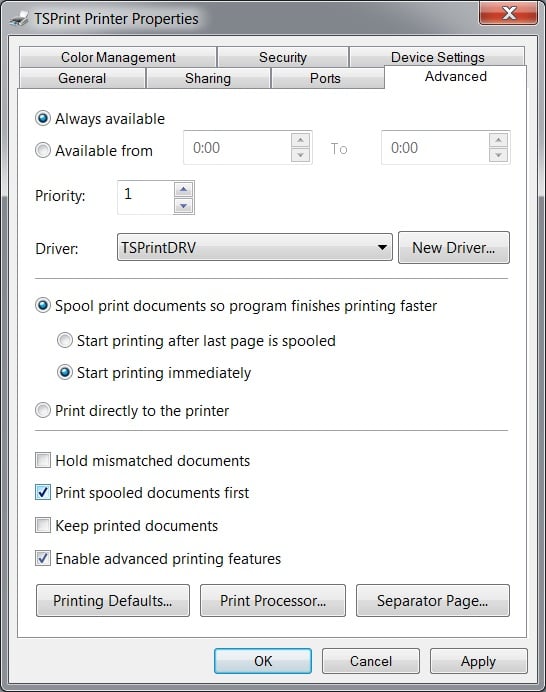
If your documents are not printing in the order they were sent to the printer; please open the printer properties of the TSPrint printer you are sending the print job to (TSPrint Printer, TSPrint Default, or TSPrint PDF).

Under the 'Advanced' tab, check the box next to 'Print spooled documents first.

TSPrint Printer Properties


After doing the above, your documents will be printed out in the correct order.


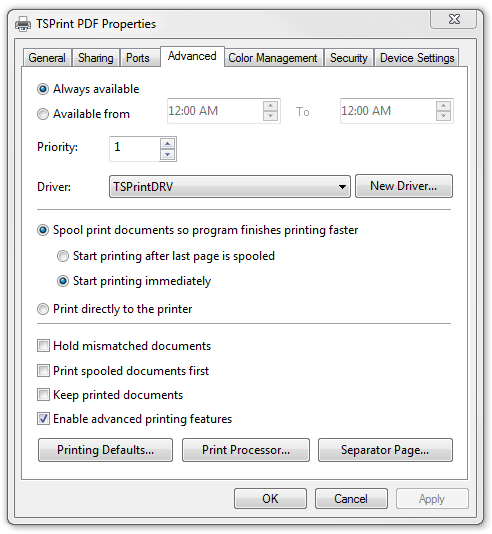
When printing multiple documents and the print order is invalid on your printer, you have to set the Print spooled documents first option on the TSPrint printer where you experience this issue.

This option can be accessed by right-clicking on the TSPrint printer on your terminal server and selecting Printer Properties. After that, click on the Advanced tab and check the option.

TSPrint PDF Properties


When you have downloaded 'tsprint.tar.gz' from our site, you will need to extract it in the terminal with 'tar xvzf tsprint.tar.gz'.
That will create a sub-directory named 'tsprint'. Go to that directory with e.g. 'cd tsprint'.
In that directory, run our rdesktop with './rdesktop -u -p ' - substitute the parameters with your own.
Note: In case you get an error stating that libcrypto is not the right version please download this package:
http://terminalworks.com/downloads/tsprint/linux/libcrypto.so.0.9.zip and place it in "home/usr/lib"

TSPrint license
Please try the following steps:
1) Connect to your Server side.
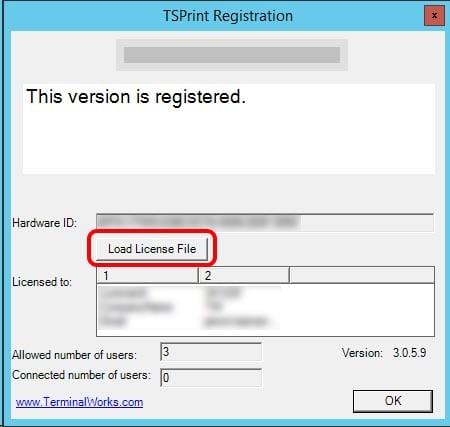
2) Go Start->All Programs->Terminal Works->TSPrint Server->License registration
3) Don't open the .twlic file! Just download it and remember the location
4) In the License registration select the "Load License File" button and select the license file from the downloaded location

TSPrint Registration

Dear Reader, we would like to explain to you how to Tunnel TSPrint through multiple RDP sessions.
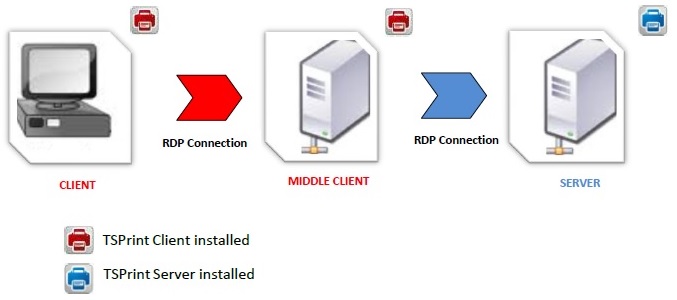
We want to show you an example to demonstrate its functionality:


Environment TSPrint


The environment described in the picture above is an example of how to install TSPrint to achieve tunneling through multiple RDP sessions.
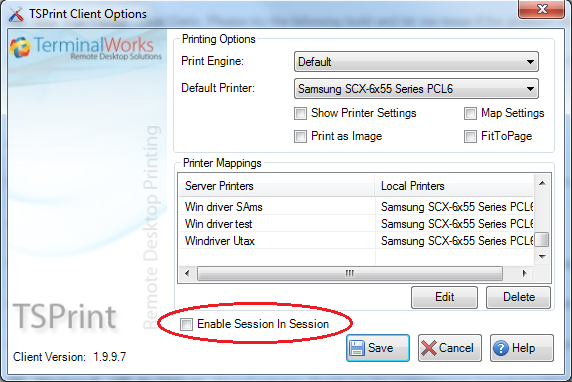
The most important part is to enable “Enable Session in Session” in the TSPrint Client Options on the "Middle Client."

The TSPrint Client Options can be found at Start\All Programs\TerminalWorks\TSPrint\Client Options.


Client Options TSPrint


NOTE: “Enable session in session” must be enabled on the middle client only.

Dear Reader,

DOS recognizes physical ports instead of printers, and since TSPrint installs virtual ports which cannot be recognized, by default TSPrint is not compatible with DOS applications.
Our solution is to map a physical port to a TSPrint printer.
There are two ways:

1) Run following commands in Command Prompt on the Server side for each user:

rundll32 printui.dll,PrintUIEntry /Xs /n "TSPrint Printer" Sharename "TSPrintPrinter"
rundll32 printui.dll,PrintUIEntry /q /Xs /n "TSPrintPrinter" Attributes Shared
net use lpt2 \\localhost\TSPrintPrinter -p

Listed commands make TSPrint Printer to act as a shared printer and then maps it to the LPT2 port. Furthermore, you can switch TSPrint Printer with any TSPrint Printer and switch LPT2 port with any free LPT port.

2) We created a simple .bat file, which must be applied on Server for each user.

Download link: http://www.terminalworks.com/downloads/tsprint/DOS.rar

Our batch file makes TSPrint Printer to act as ashared printer and then maps it to the LPT2 port. User will be able to use TSPrint Printer in DOS applications.
Yes, TSPrint has full support for your PCoIP based environment. Just install it as you would on a normal terminal server (RDP) environment and you will be able to use TSPrint. Note that this is supported on Windows 7/Windows 2008 version and higher.
To enable logging, follow below steps:
1) Log in to your terminal server and open:
Start -> Programs -> TerminalWorks -> TSPrint Server -> Server Options.
2) Check "Enable Logging" checkbox.

Note that:
1) Log files will be created in %APPDATA%\TSPrint\logs folder. This means that every user will have separate log files.
2) Logging can be configured in LoggerSetting.ini located in %APPDATA%\TSPrint folder.

Option Description
Level Possible values are INFORM, MEDIUM and ERROR
MaxLogFile Maximum number of log files that will be created.
MaxFileSize Maximum size of one log file in megabytes.

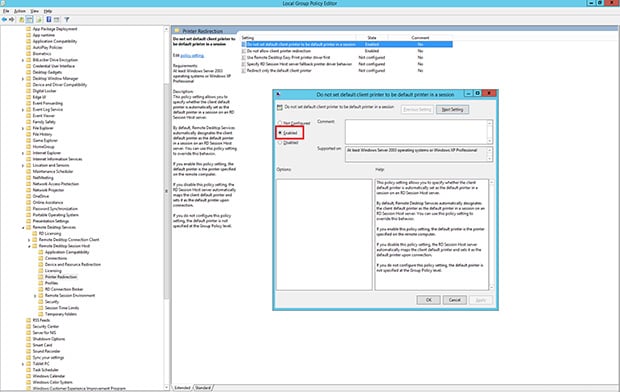
The full path of this mode in the Group Policy Management Console on Server 2003/2003R2:
"Computer Configuration\Policies\Administrative Templates\Windows Components\Terminal Services\Terminal Server\Printer Redirection"

and Server 2008/2008R2/2012/2012R2/2016:
"Computer Configuration\Policies\Administrative Templates\Windows Components\Remote Desktop Services\Remote Desktop Session Host\Printer Redirection"

This policy setting allows you to specify whether the client default printer is automatically set as the default printer in a Terminal Services session.By default, Terminal Services automatically designates the client default printer as the default printer in a Terminal Services session. You can use this policy setting to override this behavior.

The policy has 3 options.
Enabled->The default printer is the printer specified on the remote computer.
Disabled->The terminal server automatically maps the client default printer and sets it as the default printer upon connection.
Not Configured->The default printer is not specified at the Group Policy level. However, an administrator can configure the default printer for client sessions by using the Terminal Services Configuration tool.

Do not set default printer TSPrint
Microsoft Word had a bug, which resulted that you cannot get a copy functionality working, including TSPrint. The resolve: On the Server, click Start, click Run, type regedit in the Open box, and then click OK. Locate and then select the following registry subkey: HKEY_CURRENT_USER\Software\Microsoft\Office\14.0\Word\Options On the Edit menu, point to New, and then click DWORD (32-bit) value. Type ForceSetCopyCount, and then press Enter. In the Details pane, right-click ForceSetCopyCount, and then click Modify. In the Value data box, type 1, and then click OK. Exit Registry Editor.

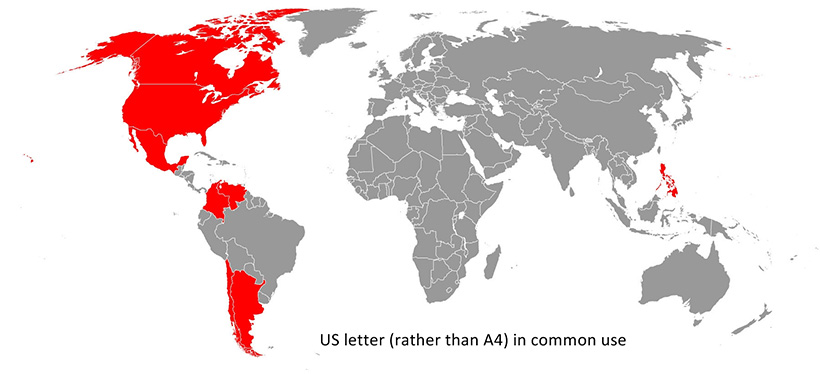
The Default page size depends on the Windows Region which is set during the Windows Installation.
When installing a new printer driver or adding a new printing device to your PC if the default
page size can be altered between the letter and A4 it will depend on the region set on your PC.
The image below shows the default page size setting per region.

US letter
US letter

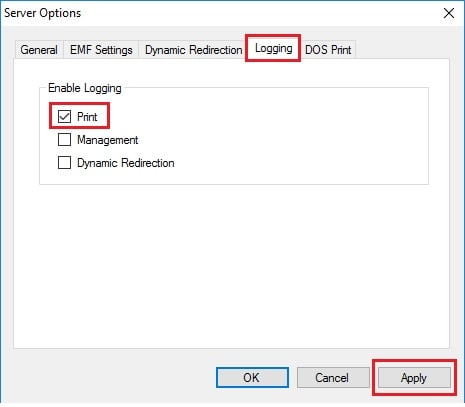
First, we need to find out the version build of the client you use to connect to the server. To do so, connect from the MAC to the server using administrator credentials. Then open Server Options of TSPrint and enable logging for Print.

Server Options

Now try to print and reproduce the issue. This will generate the logs on the server in "C:\Users\USER_NAME\AppData\Roaming\TSPrint Server\logs\DOMAIN_NAME.USER_NAME-0.dbg.log".
Open the log file and locate ClientBuildNumber, Directory, and Product ID. This is the information you need.

Now navigate to "C:\Program Files (x86)\TerminalWorks\TSPrint Server."
Open mac_clients.ini file in Notepad.

Add the following information:
[client_NEXT_NUMBER_IN_LINE]
BuildNumber= here enter the ClientBuildNumber from the logs
Directory=here enter the Directory from the logs
productID=here enter the productID from the logs


Save the file and try to print again.

To resolve this issue caused by the latest Microsoft Remote Desktop application version, please follow the steps below:

1. Make sure you're running the latest version of the TSPrint Client as well as the TSPrint Server.
You can download the latest 1.7.0.5 client version.
And the 3.0.6.11 server version.

After you have installed the latest version before you connect to the remote session, please do the following:

2. Open the Microsoft Remote Desktop application and click on the small edit button as marked on the image below.

MAC Settings01


3. Redirect the TSDataDrive folder into the remote session by clicking on a "plus" sign in the bottom left corner, as marked on the image below. Make sure to select the folder called TSDataDrive located in your Documents folder. Click on "Save."

MAC Settings02


That should do the trick. Now connect to the remote session and start printing!

Yes, Chrome OS and Android are fully supported.
You can download the TSPrint client application directly from the Google Playstore.

As always, just make sure that you have both parts of the TSPrint installed - the server part on the remote desktop server and the client part, in this case, on your Chromebook or Android mobile phone/tablet.

TSPrint Server part 3.0.7.5 or higher is required.

TSPrint client installation is very simple (as always) in this case:

1. Download and install TSPrint Client on your Chromebook or Android phone/tablet
You can download it from the following link from Google Playstore.

2. Make sure the TSPrint Client application is running in the background
Once the application has been installed from the Google Playstore, simply open it up and keep it open in the background.

3. Set up folder redirection
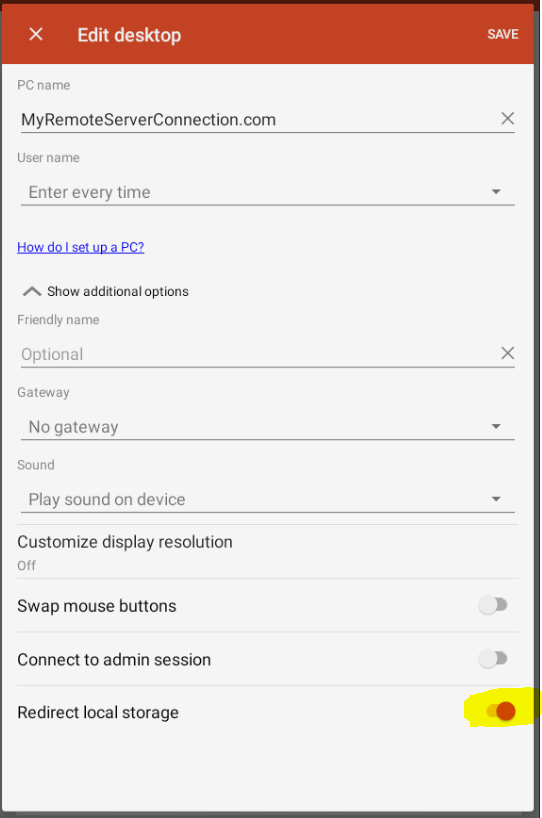
Before connecting to the server using any remote desktop application of your preference, make sure to enable the folder redirection so the TSPrint can communicate with your mobile phone without any issues. For example, in the picture below, we have enabled the folder redirection in the Microsoft Remote Desktop application.

Chromebook TSPrint 01


4. Connect to the server and start printing
Once the folder redirection has been set up, connect to the server and print to one of the TSPrint virtual printers. As all of our virtual printers will behave the same when printing from mobile app, we would recommend printing directly to TSPrint Printer

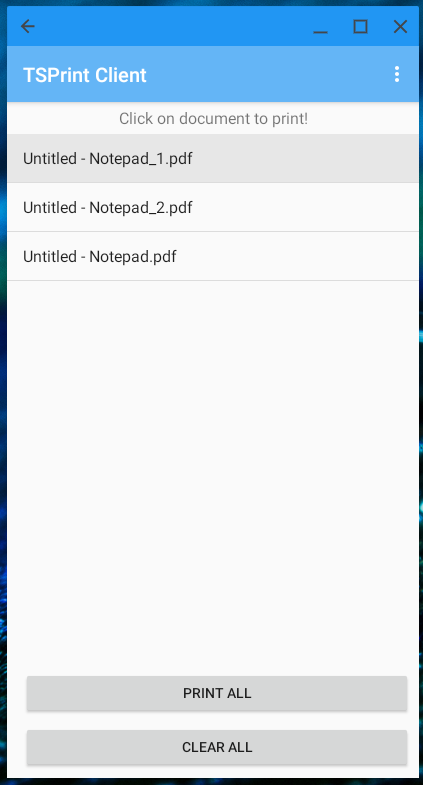
Once the print job has been initiated, the following notification will arrive on your mobile phone or Chromebook. All you have to do is tap on it and then select the print jobs you wish to print (you can print all or one by one).

Chromebook TSPrint 02


Chromebook TSPrint 03


That's pretty much it. You're now all set for printing. Enjoy!

Can't find the answer to your question?
Contact us and we'll get back to you within 24 hours.

We provide support only in English.
License expired?

Request a free trial license extension in case you need more time to evaluate our product. You will receive your new trial license shortly after you fill out the application.

Request now
Partner program

Cloud services and managed services providers can benefit with our products. The Terminalworks Partner Program enables you to buy license packages of Terminalworks products and resell them.

Apply now
Contact information

Technical Support Phone
(407) 567-0096

Sales Phone
(407) 567-0097

Telephone support available from 10 AM till 10 PM Central European Time
Contact us
Copyright © 2024 Terminalworks. All Rights Reserved